
Arrive Prepared With This Jewish Wedding Photography Guide!
If you’ve never photographed a Jewish wedding before, you’re in for a treat. There’s more singing, dancing, and joyful chaos than you might have ever experienced before. This Jewish wedding photography guide reflects my experience photographing Chabad, modern-Orthodox, traditional egalitarian, Conservative, and Reform weddings. Some couples do everything mentioned here, others skip certain parts, and many add their own customs and quirks.
Here’s what you need to know upfront: Jewish weddings can have tremendous variation. Some couples include all the rituals described here, while others skip elements or modify traditions. More traditional weddings might have stricter gender separation or additional customs not covered here. Less traditional ceremonies often blend Jewish traditions with other elements.
Always discuss specific ceremony details with your clients in advance. Ask about their particular traditions, any modifications they’re planning, and whether there are moments when photography may be restricted. This Jewish wedding photography guide will help you anticipate the general flow and key moments, but flexibility and communication are essential for authentically capturing their unique celebration. There usually is a lot going on; this guide is designed with (at least) two photographers in mind!
Capture Every Important Moment With This Jewish Wedding Photography Guide!
Tisch & Pre-Ceremony Festivities
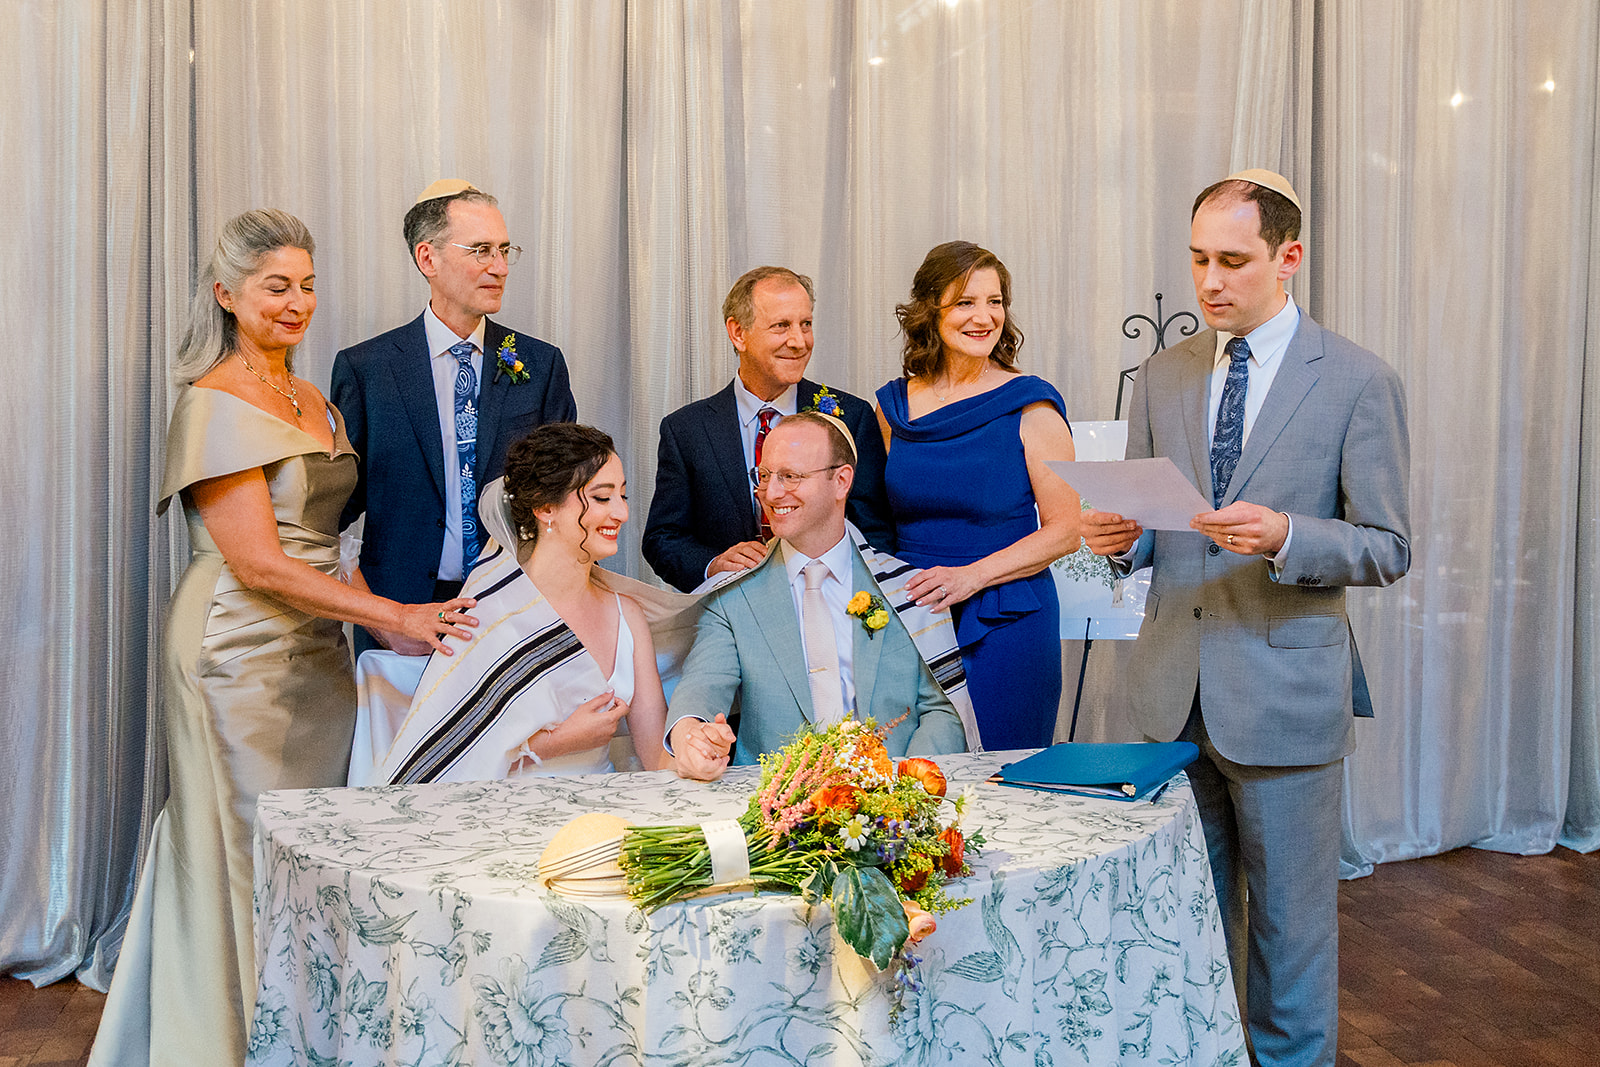
First up in this Jewish wedding photography guide is the tisch. The tisch (literally “table” in Yiddish) traditionally involves the groom and male guests gathering for drinks, singing, and speeches before the ceremony. Meanwhile, the women often have their own gathering called kabbalat panim with the bride. This is also when important documents like the ketubah are signed by witnesses, so be ready to capture these meaningful legal moments alongside the celebration.
Expect playful interruptions during the tisch – guests will often break into song right in the middle of speeches, leaving the groom mock-offended by the interruption. It’s all part of the fun and creates wonderfully candid moments.
Modern Variations
You might encounter separate tisches for each partner or even a joint tisch where everyone is together. Some couples skip the tisch entirely, so always confirm what’s planned.
Tisch Photography Tips
The tisch can get pretty cramped with lots of people around a table, so use a wider lens to capture the whole scene. Watch for spontaneous song breaks – keep your camera ready for those candid reactions when the speaker gets mock-offended by the interruptions! For the ketubah signing, position yourself to capture both the actual signing and the witnesses watching. The lighting might be dim depending on the venue, so don’t be afraid to bump up your ISO. Get detail shots of the documents after they’re signed – these become family heirlooms.

Bedeken
Next up in this Jewish wedding photography guide is the bedeken. During this part of the day, I almost always start crying. This moment consistently ranks as one of my favorites to photograph because the energy and emotion are absolutely incredible. The bedeken involves the couple seeing each other before the ceremony as the veil is placed.
Traditional Approach
The bride sits in a special chair (often decorated with flowers) while the groom, accompanied by the tisch participants, marches over with singing and celebration. He places the veil over her head, followed by blessings from the parents. In more traditional ceremonies, this might be the first time the couple has seen each other in a week, which adds even more emotional intensity.
Egalitarian Approach
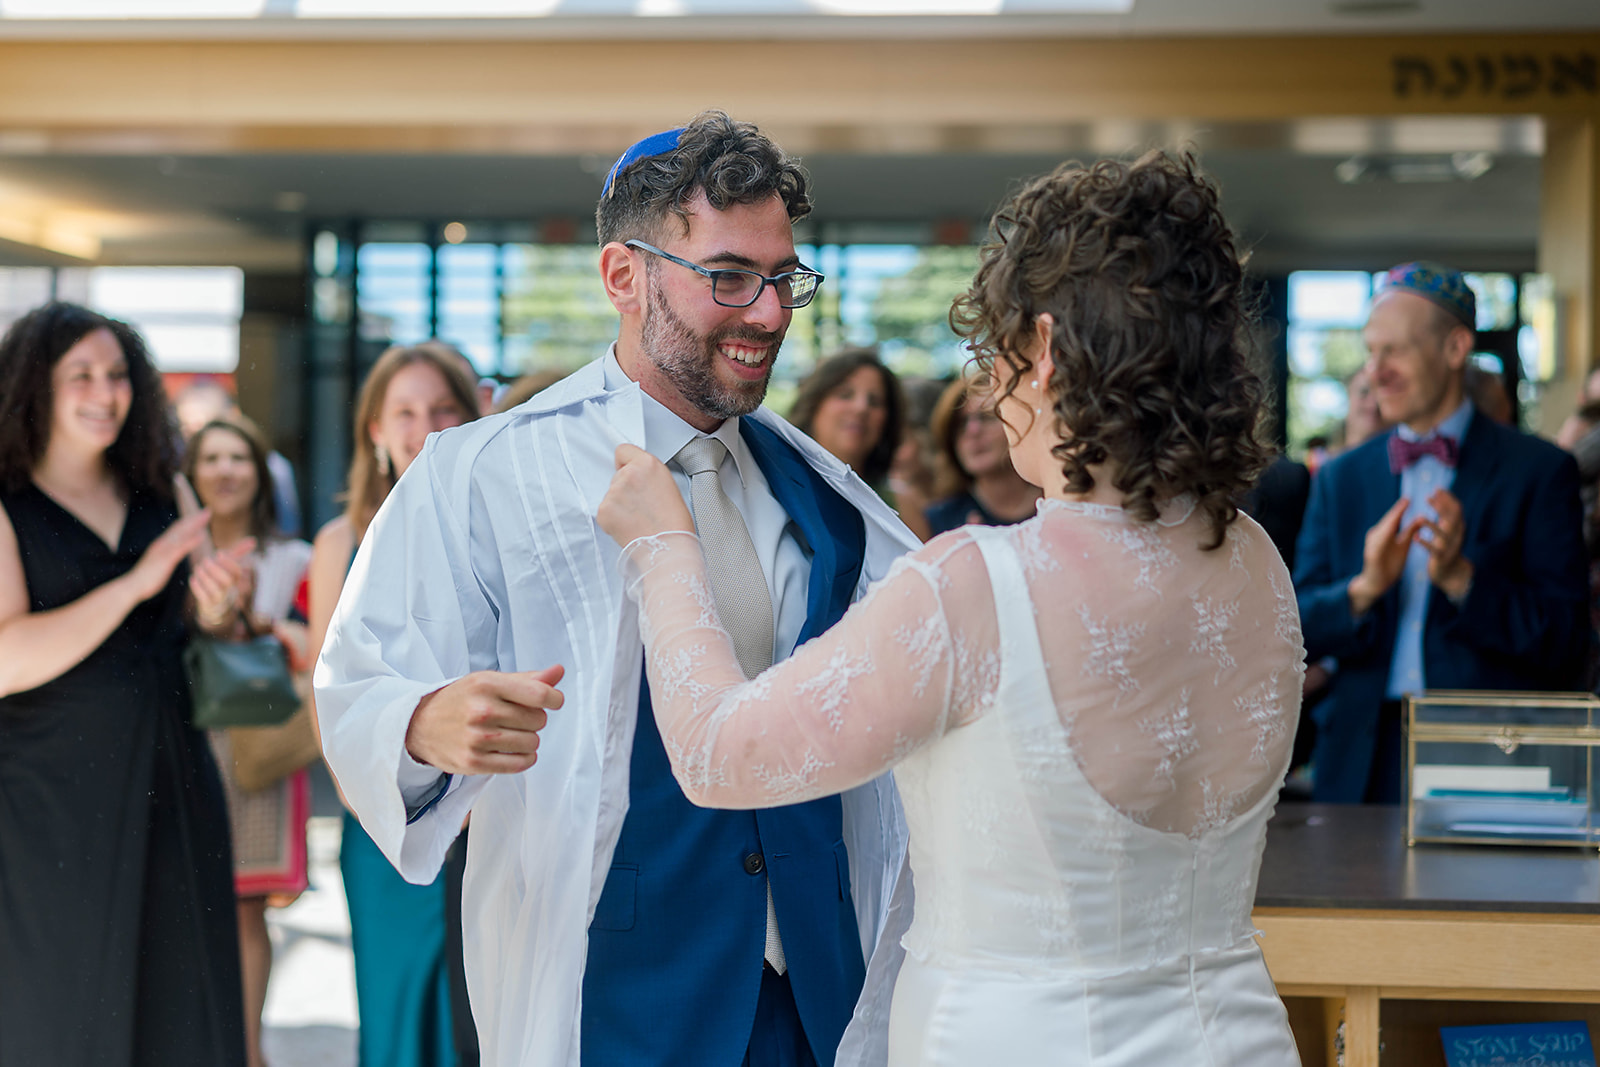
The basic choreography stays similar – the nearlyweds come together as everyone sings. Once they’re settled, facing each other with their loved ones surrounding them, they might veil each other, help each other with ritual garments like a kittel, or place flowers in each other’s hair.
Photography Tips
This is all about anticipation and emotion. If both partners are marching together, you’ll need to FIGHT to stay at the front of the crowd! Use a wide lens for this, as people will be pushing forward quickly.
Chuppah

Moving on to our next phase of this Jewish wedding photography guide! Okay, so the word “chuppah” can be confusing if you’re not familiar with Hebrew. It has two meanings: THE chuppah is the canopy where weddings take place, but it can also refer to the ceremony itself. For this guide, we’re focusing on the chuppah as the Jewish wedding ceremony and each step you should be ready to capture.
Circling
After the processional, the ceremony traditionally begins with one partner circling the other 7 times. Alternatively, the couple might circle each other in a 3/3/1 arrangement. (To get a sense of what that might look like – in my wedding I circled Alex 3 times, he circled me 3 times, and we “circled each other” once). After this, the officiant makes a speech and begins the ceremony.
First Blessings and Ring Exchange
The first part includes the kiddush (blessing over wine) and the ring exchange (well technically, it’s not always an exchange, but that’s a whole other thing that doesn’t matter for photography purposes). The ketubah is then read – keep in mind this is long and traditionally in Aramaic, so it’s a good time to reposition for different angles.
Sheva Brachot
Next comes the sheva brachot—the seven blessings. Family members or honored guests are called up one at a time to recite each blessing. Watch for emotional reactions from the couple and their families during this part.
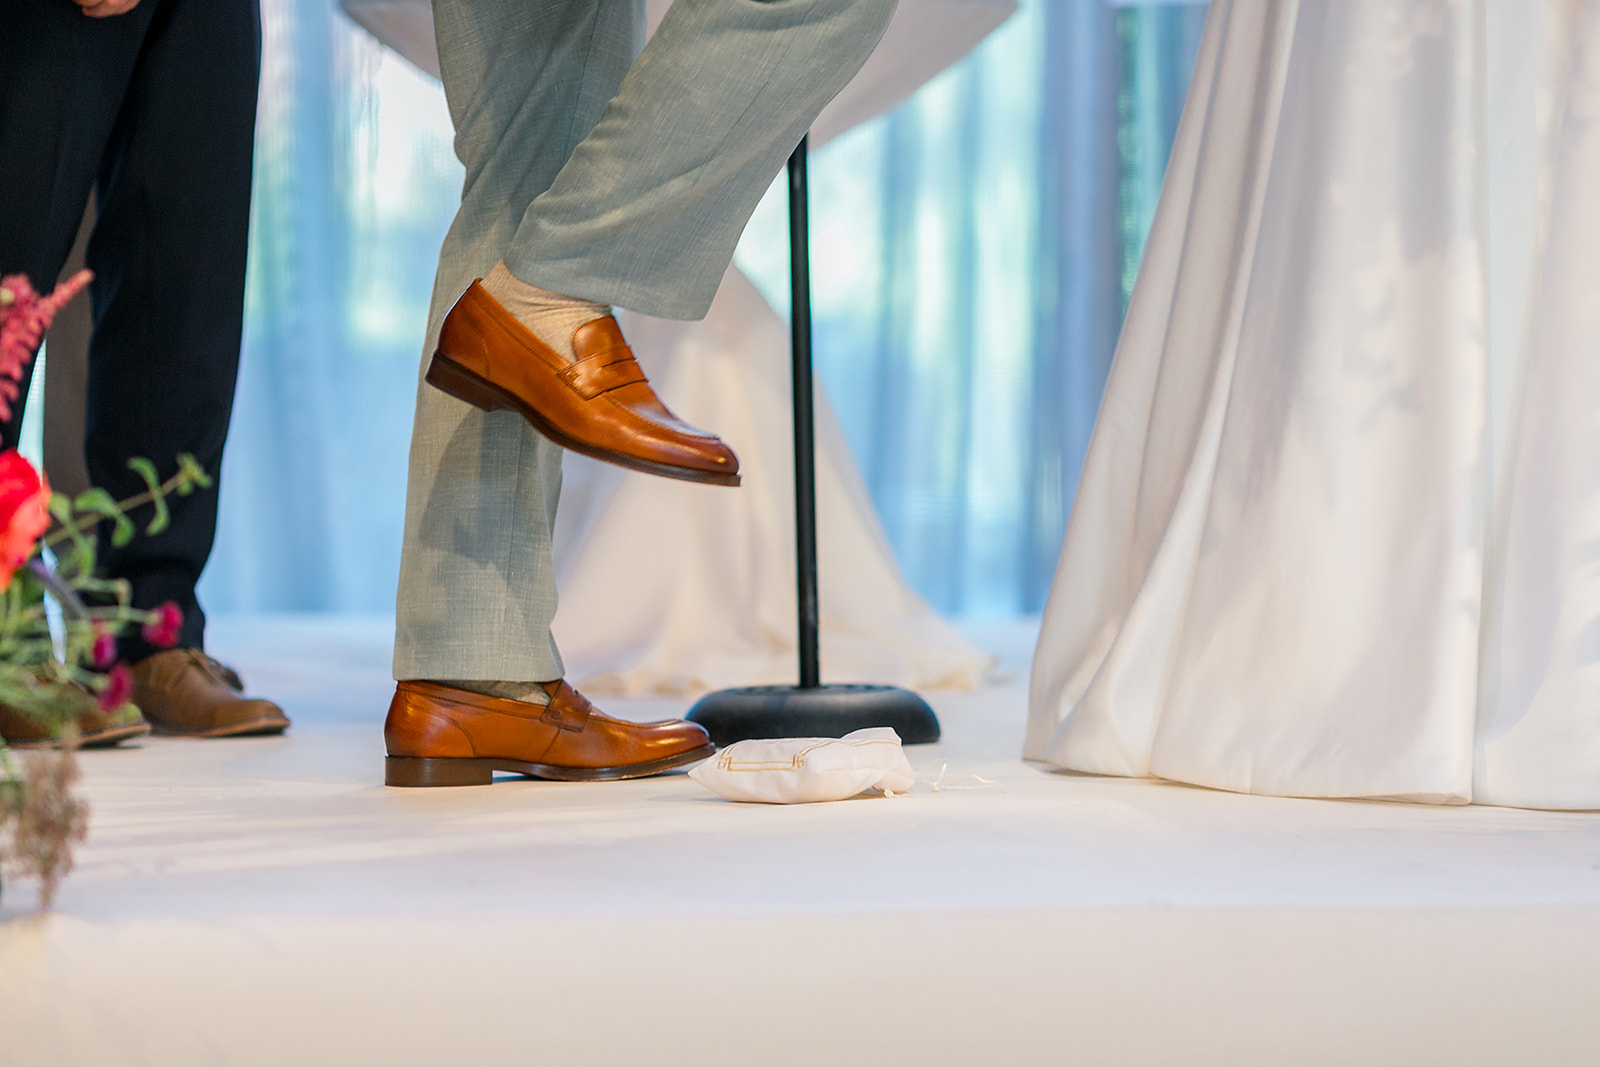
Glass Breaking
The ceremony concludes with a solemn moment – often the singing of “Im Eshkachech Yerushalayim” (If I Forget Thee, O Jerusalem) – which grounds everyone before the most iconic moment. You gotta be ready and in position for the glass breaking, as there’s traditionally no warning or countdown. It happens quickly, right at the end of the sad song. One or both partners break a glass (wrapped in cloth), and then everyone erupts in shouts of “Mazel Tov!”
Photography Tips
For the glass breaking—this is THE moment everyone’s waiting for—crouch down in the center of the aisle to capture the actual smashing. I’ll get a close-up of the glass and ask my second to stand directly behind me and get a wide shot of the entire scene. Make sure to turn on burst mode for this—it also makes a fun GIF!
March To Yichud
Let’s tackle the march to yichud for our next section in this Jewish wedding photography guide. Immediately after the chuppah, in a more traditional setting, everyone begins singing and dancing for the march to the yichud room. The yichud room gives the couple a few minutes alone together after the ceremony – their first moments as a married couple. This march is full of loud, energetic people singing and dancing in full celebration mode.
What You Need to Do
FIGHT to stay in front of the crowd to capture the happy newlyweds. There will be people (“guards”) stationed at the yichud room door to ensure the couple gets their private time. The crowd will surge forward, and you need to move quickly to capture both the joyful chaos and the couple entering the room. Have your second photographer grab shots of the celebrating crowd from behind or from an elevated position if possible.
March to Yichud Photography Tips
This march is pure chaos in the best way possible. Use a wider lens and higher ISO because you’ll be moving fast, and the lighting might be inconsistent as you move through different spaces. Focus on the couple’s faces as they’re swept along by the crowd – their expressions are pure joy. Get some shots from behind them showing the sea of people following, but your priority is staying ahead of the crowd. Don’t worry about perfect composition – the energy and movement are what matter here. When you reach the yichud room, capture that last moment before the door closes, then step back and let them have their privacy.
Simcha Dancing + Shtick

This is one of my favorite sections in this Jewish wedding photography guide. While the couple is in yichud, guests head to the reception space. Sometimes there is cocktail hour during this time. When the couple emerges from yichud (usually after about 15 minutes), this is your opportunity for quick portraits before the reception – work fast, as everyone’s eager to celebrate!
When they make their entrance at the reception, the simcha dancing begins immediately. The couple might run in under feather arches. Be ready for serious energy!
Traditional Celebrations
There will be a divided dance floor with two circles – one for men and one for women. Have a conversation with your couple in advance about comfort levels with photographers entering different gendered spaces. Some traditional communities prefer female photographers for the women’s circle and male photographers for the men’s circle. Others are more flexible. Your couple will know their crowd and can guide you on what’s appropriate – they might even arrange to have both male and female photographers specifically for this reason. If you’re working solo and there are restrictions, focus on the circle you can photograph and get creative with angles for the other.
Egalitarian Celebrations
The two circles may merge, or there may be only one circle to begin with.
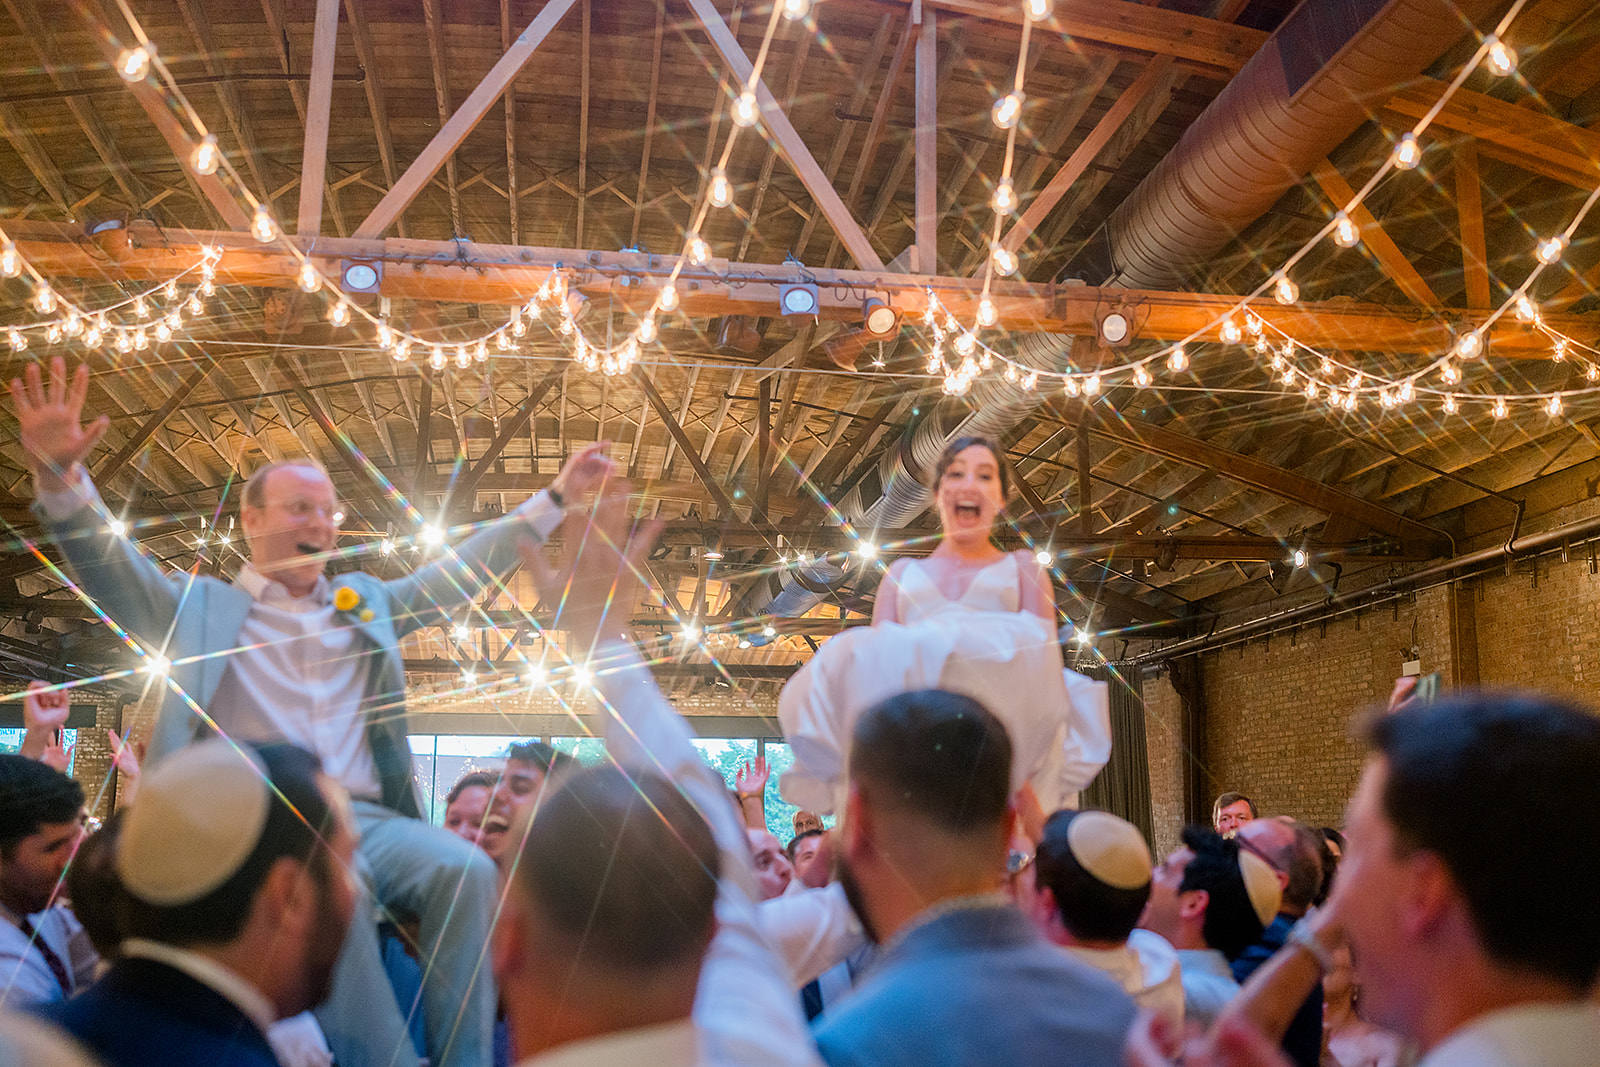
You’ll want two angles for simcha dancing. The first is right in the thick of things, capturing the couple’s faces and their immediate circle. Meanwhile, your second photographer should find something to stand on outside the circle to capture the whole scene. This second angle is especially crucial when the couple gets lifted on chairs – you’ll want both the couple’s reactions and the sea of people holding them up!

The Shtick
This is my absolute favorite part. After about 30 minutes of dancing comes the shtick – and this is where things get wonderfully and unapologetically ridiculous. The couple sits in chairs on the dance floor while guests perform for them, trying to make them laugh with costumes, props, inside jokes, and creative antics.
Photography Tips
As the lead photographer, stand behind the couple, facing the shtick performers. Have your second photographer stand off to the side behind the performers so they can capture the couple’s reactions.
The simcha dancing is intense and requires stamina! For the circle dancing, you need two distinct positions working together. One photographer should be right in the middle of the action with a shorter lens (I like a 16mm or 24mm), capturing the couple’s faces and the immediate energy around them. The other photographer needs elevation – find a chair, table, or balcony to capture the full scope of the dancing, especially when the couple gets lifted on chairs.
For shtick: As the lead photographer, stand behind the couple, facing the shtick performers. Have your second photographer stand off to the side behind the performers so they can capture the couple’s reactions.
The shtick is pure gold for storytelling. Position behind the couple so you can see their faces as they react to each performance. Use a longer lens so you’re not right in the performers’ space. Your second shooter should be mobile, capturing the performers from different angles and the wider scene.
Dinner + Speeches

Next up in the Jewish wedding photography guide is dinner! The dinner portion starts with hamotzi – the blessing over the challah bread. Speeches often happen throughout dinner, similar to secular weddings you might be familiar with.
Dinner might be divided into courses interspersed with rounds of dancing. Usually, there are 3-4 dance sets: simcha dancing, salads, dance set, main course, dance set, dessert and benching, and final dance set.
Final Sheva Brachot
After the meal, during benching (grace after meals), there’s another round of sheva brachot. This time it’s more intimate – selected guests are brought into a circle with the couple to recite the blessings over wine. Each blessing is often given by different important people in the couple’s life. Position yourself to capture the person giving the blessing and the couple drinking the wine at the end.
Photography Tips
Dinner can feel like a break, but stay alert for those spontaneous dance breaks between courses – they happen fast! For the hamotzi, capture both the blessing over the challah and everyone breaking bread together. The speeches are similar to any wedding, but you might have more of them throughout the meal rather than all at once.
The final sheva brachot are more intimate than the ceremony ones. You’ll usually have people sitting in a close circle, so use a longer lens to capture from outside the circle without intruding. Focus on the person reciting each blessing. The wine sharing at the end is a key moment – get tight shots of their hands on the cup together. This is often more emotional than the ceremony version because everyone’s more relaxed and the day’s joy has built up.
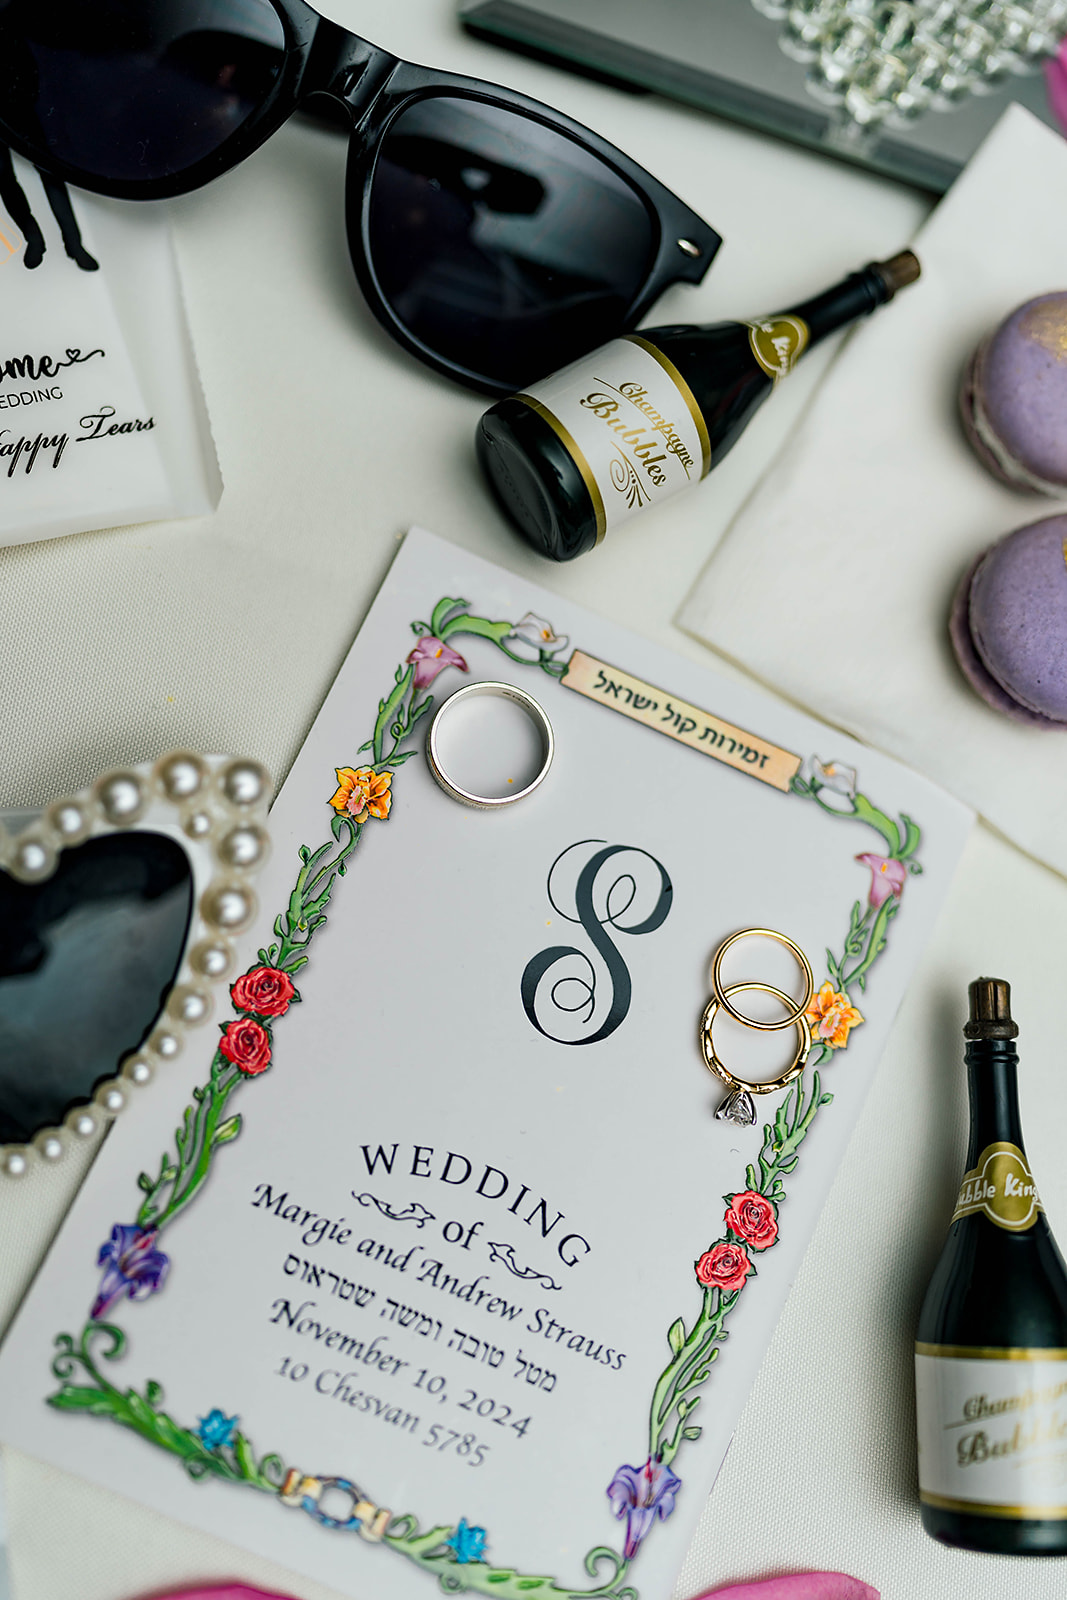
Special Sentimental Items
An important piece of this Jewish wedding photography guide: the sentimental items. Keep an eye out for meaningful details throughout the day. Many couples incorporate special sentimental items that make beautiful detail shots. (For my own Jewish wedding, I had a jean jacket pocket made from my mom’s and grandma’s wedding dresses!)
Look for:
- Custom kippot with the couple’s names and wedding date embroidered inside
- Personalized benchers (prayer books) on tables – these usually have custom covers designed for the wedding and double as favors
- The chuppah itself often has deep meaning – many are made from family tallit (prayer shawls) or incorporate materials from grandparents’ weddings
Ask your couple in advance about any special family items or heirlooms (like a kiddush cup) they’re incorporating. These details help tell the complete story of their day.
Photography Tips
Jewish weddings are detail-rich, so arrive early to capture everything before guests arrive. The custom kippot and benchers make great flat-lay shots with the invitation suite. Get close-ups of the ketubah before and after signing – the calligraphy is often gorgeous. If the chuppah is made from family tallitot, capture both wide shots showing the whole canopy and detail shots of the fabric and any special embroidery or personal touches.

Bonus — Large Family Formals – Your Jewish Wedding Photography Survival Guide
Last but not least, I wanted to provide this special bonus to my Jewish wedding photography guide! Okay, so, let’s talk about the elephant in the room—Jewish family formals can be MASSIVE. I’m talking 50+ people sometimes, multiple generations, complex family dynamics, and everyone having an opinion about where they should stand. But here’s the thing—with proper preparation, these can actually be some of the most meaningful and treasured photos from the entire day.
Pre-Wedding Preparation is Absolutely Crucial
During your consultation (and I cannot stress this enough), sit down with your couple and have them create a detailed list of every single family grouping they want. Don’t just wing this on the wedding day – you’ll end up with chaos, forgotten people, and a very stressed couple.
Have The Couple Designate Family Wranglers
This is the secret weapon that most photographers don’t use. Ask your couple to choose one loud, friendly, organized person from each side of the family – someone who knows everyone’s names and isn’t afraid to use their voice. These people become your best friends during formals. They’ll help gather people, keep track of who’s missing, and manage the crowd while you focus on actually taking the photos.
Print Out The List and Bring Copies
I always print multiple copies of the family formal list and give them to the couple and the wranglers, keeping several for myself. When things get hectic (and they will), having that physical list keeps everyone on track. I also bring a clipboard—it sounds silly, but it makes you look organized, and people listen to someone with a clipboard!

Logistics and Timing
Schedule these formals strategically. If the couple is seeing each other before the tisch, this is your golden opportunity – do all the formals then! Everyone’s already dressed and ready, the energy is high, and you’re not competing with cocktails or dinner.
If they’re not doing a first look before the tisch, your next best option is right after the couple leaves the yichud room, especially if there’s cocktail hour happening then.
Here’s the most brilliant solution, though – and I did this at my own wedding to minimize the formal photo stress. Do the massive group photos right on the dance floor during the reception! Wait for a natural break in the dancing, then have the MC announce it’s time for family photos. Everyone’s already gathered, the energy is incredible, and you get these amazingly joyful group shots with the reception energy still buzzing. Plus, it becomes part of the celebration rather than feeling like a chore that’s pulling people away from the party.
Photography Tips
Large Jewish family formals require serious crowd management skills. If possible, position yourself on something elevated—even a small step stool can help you see over the front rows and command the group better. Use a wide lens (I usually use a 24mm or 35mm) and step way back—you’ll need more space than you think for 50+ people.
Work Fast, But Don’t Rush The Moment
Take multiple shots because in a group that large, someone’s always blinking or looking away. I usually take 8-10 shots per grouping to make sure I have at least one where everyone looks good. Call out “one more!” to get people’s attention back if they start chatting.
Managing The Chaos
Large families can get loud and chaotic quickly. Use your wranglers to keep gathering the next group while you’re photographing the current one. Have a system – I usually start with the largest group (everyone) and then break it down into smaller groupings. This way, once people are dismissed from the big group, they can head to cocktail hour, and you’re not trying to re-gather them.
The Payoff is Huge
Yes, large Jewish family formals are work, but they’re often the most treasured photos from the entire wedding. These families value tradition and legacy, and having that four-generation photo or the shot of all 30 cousins together becomes a family heirloom. Put in the effort to do them well, and your clients will be forever grateful.

I Hope This Jewish Wedding Photography Guide Helps You Feel Confident During Your Next Celebration
Every wedding has its own unique flow and special moments. It’s impossible to fit every variation and custom into a single Jewish wedding photography guide, but I hope my experience as both a Jewish bride and wedding photographer helps you capture these celebrations with confidence.
Remember – when in doubt, ask your couple about their specific traditions. Your couple will appreciate a photographer who takes the time to understand what will make their specific celebration meaningful. With preparation, flexibility, and respect for tradition, you’ll create images that families will treasure for generations.


